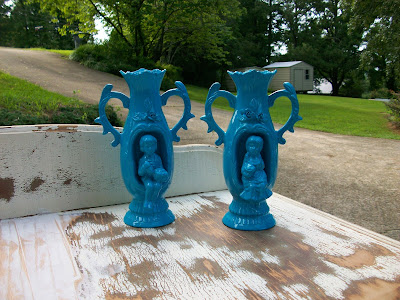
I found these beauties at the local thrift store for $1.39. They were originally $1.39 each, but they were 50% off. What a deal! (But wow, they are bad!) There is some damage, the flower is missing off the boy vase and the arm is missing off the girl vase.
Saturday, July 20, 2013
Vases Before and After
I found these beauties at the local thrift store for $1.39. They were originally $1.39 each, but they were 50% off. What a deal! (But wow, they are bad!) There is some damage, the flower is missing off the boy vase and the arm is missing off the girl vase.
Thursday, July 18, 2013
Child's Bench
Earlier this summer, my mother's neighbor gave this bench to my mom. Her neighbor found it in the garbage, and gave it to my mom when my daughter was playing at their house. I cannot find my before picture . . . .
The metal was green and rusty, and the varnish was peeling off the wood which was stained lighter. It was in great structural condition, and is very heavy. You can find these at Lowe's and other outdoor stores all summer long. They are about $100 new.
I cleaned and spray painted the metal, and spent a lot of time sanding the varnish and stain off the wood. The whole project was less than $12!!! I used left over primer, and purchased one can satin spray paint, one small can dark stain, and one can spray polyurethane! I put 5 coats of poly on it, since it will be in the sun and outdoors.
Saturday, July 13, 2013
Repairing Veneer on a Painted Piece
You may remember this disaster. The veneer clearly got wet sometime in the past and had bubbled up. So, time to fix it!
I just measure on the spot, and only used half of the veneer. It very easily glued down with the iron. The box cutter easily cut it. Luckily, this veneer was the same depth as the original veneer, and only needed one layer. It did shrink a tiny amount once it dried, and you can see the seems. That is okay because:
I plan to paint it a bright white, with a blue off center stripe (thanks Classy Clutter for the paint idea). I found some awesome patina brass drawer pulls at the Decatur Habitat for Humanity (ReStore) for $1 each. This piece had no pulls when I found it. Here is what it looked like when I found it: Oh So Dirty Dresser.
Thanks for stopping by! Leave a comment if you have any creative ideas for this chest!
Subscribe to:
Comments (Atom)


